OpenWrt NetSoM users guide. Using as Amazon Alexa development kit.
Here described steps to use as NetSoM development board as Alexa development kit and run Alexa Sample App.
Hardware requirements.
You have to stick WM8960 audio module to NetSoM development board. This setup will act as SIP client allowing to make a voice calls to/from another devices in network.
Software requirements.
You have to use amazon_voice_service or amazon_voice_service_wifi images. Steps to update NetSoM firmware described here.
Amazon Voice Service product registration.
In order to work with avs-device-sdk you need to compile one variant of amazon-voice-servce firmware. While doing this you need to register on main Amazon Developer portal in order to add device in their system. After firmware is flashed on board you’ll need to initiate SampleAPP or your application with proper configuration and proceed with standard steps of Authorization.
By default this firmware provides SampleAPP and all necessary libraries from avs-device-sdk. Configuration in firmware is stored in /etc/alexa/ directory.
All of this is described in next chapters.
Register device and profile.
This is part of official documentation from Amazon Developer site – Prototyping – Register a product.
- Create an Amazon developer account
Create a free developer account at developer.amazon.com. If you already have an account, you can skip this step.
- Create a product.
After you’ve created an Amazon developer account, you create a product and security profile. This authenticates your software client so it can connect to AVS.
To create a product:
- Log in to the AVS dashboard.
- Click
PRODUCTS. - Click
ADD NEW PRODUCT.
-
Fill in product information
You now must fill in your product information. This information identifies your device with AVS.
To fill in your product information:
- Choose a
Product Name. For example,AVS Tutorials Project. - Choose a
Product ID. For example,PrototypeIMX6ULL.
Don’t use any spaces in your product name.
- In the
Please Select Your Product Typedropdown, selectDevice with Alexa built-in. - For
Will your device use a companion app?, chooseNo. - In the
Product Categorydropdown, selectOther (please specify). - Write a meaningful description in the
Brief product description box. For example,Prototype. - Under
How will users interact with your product?, selectHands-free. - Skip the
Upload an image step. This isn’t required for prototyping. - Under
Do you intend to distribute this product commercially?, selectNo. - Under
Will your device be used for Alexa for Business?, selectNo. - Under
Is this device associated with one or more AWS IoT Core Accounts?, selectNo. - Under
Is this a children’s product or is it otherwise directed to children younger than 13 years old?, SelectNo. - Click
NEXT.
-
Set up your AVS security profile.
A login with Amazon (LWA) security profile associates your security credentials with your product.
To set up your security profile:
- Click
CREATE NEW PROFILE. - Under
Security Profile Name, enter a relevant name. For example,AVS Tutorials Project. - Under
Security Profile Description, enter a relevant description. For example,AVS Tutorials - Click
NEXT. YourSecurity Profile IDgenerates. - Select the
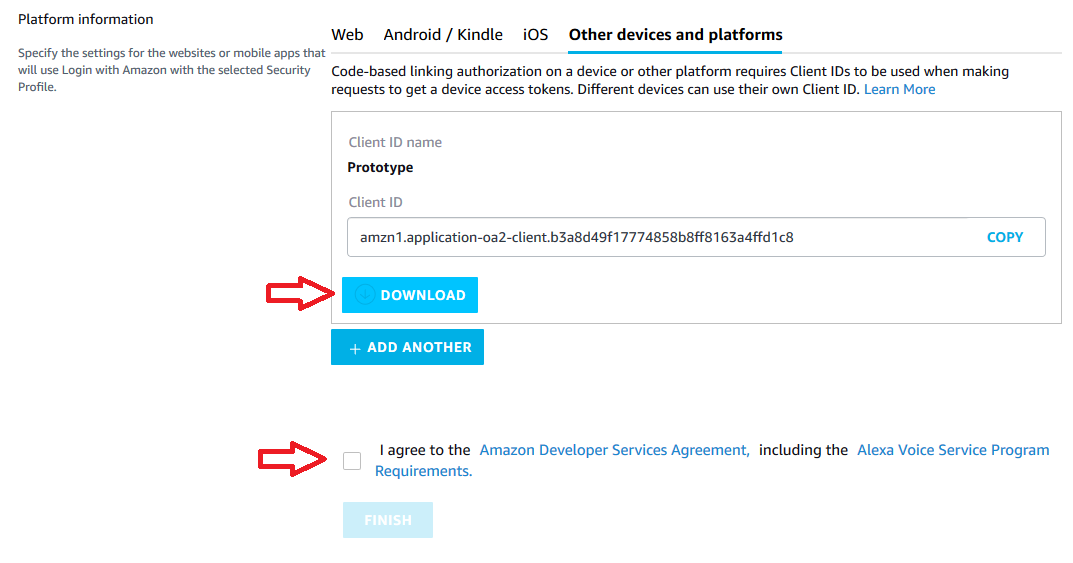
Other devices and platformstab. - Under
Client ID name, enter a relevant name. For example,Prototype. - Click
Generate ID. - Click
Download. This downloads your config.json file that contains your AVS credentials. Save the file to your home directory directory. This file will be needed in next chapter. - Read the Amazon terms and conditions. If you agree, check the
I agree to the AVS agreement and the AVS Program Requirementsbox. - Click
FINISH. Congratulations! You now have access to AVS. - A pop-up appears. Click
OK. You can now view your device on your AVS dashboard.
The following screenshots highlight the important steps described in the previous section.

Configuration of Amazon Voice Service in Firmware.
When firmware is compiled and flashed on board you’ll need clientID and productID from previously downloaded from AVS dashboard config.json file. You need to copy them into /etc/alexa/AlexaClientSDKConfig.json file in section deviceInfo. Also you’ll need to fill deviceSerialNumber, manufacturerName and description with your information in that file.
Be aware, that ‘clientIDandproductID` is generated by AVS and used for authorization.
For example, section of AlexaClientSDKConfig.json will be:
// Unique device serial number. e.g. 123456
“deviceSerialNumber”:”123456″,
// The Client ID of the Product from developer.amazon.com
“clientId”:”at5544″,
// Product ID from developer.amazon.com
“productId”:”amzn1.application-oa2-client.ec4582853953483a89fdade69f066cb18″,
// The name of the device manufacturer.
“manufacturerName”: “Temp”,
// The description of the device which should contain the manufacturer name or how the device is connected.
“description”: “Temporary test device for compatibility checks.”
},
First run and test.
On first run SampleApp will ask you to enter PIN on AVS website. To run SampleApp in firmware type in console:
On first run you’ll see message like this:
# NOT YET AUTHORIZED #
##################################
################################################################################################
# To authorize, browse to: ‘https://amazon.com/us/code’ and enter the code: {XXXX} #
################################################################################################
You’ll need to login to AVS and input XXXX code. After this SampleApp will automatically switch to Authorized state and you can test AVS.
SampleApp does not support keyword/hotword activation, so you’ll need to activate service manually. To do this just type t and Enter, after that Alexa will switch to Listening state and you can say “Tell me a joke” or “Pick a number between zero and ten” in microphone. In first case Alexa will tell you joke, in second it’ll say random number between 0 and 10. To exit application use Ctrl+C combination.
Coming soon at CrowdSupply!