How to debug u-boot
In previous two chapters: 1 and 2 we used Eclipse IDE to debug Embedded Linux user layer application. In that post we will use Eclipse as IDE to debug U-boot using usb debugger J-Link connected to target hardware using JTAG interface.
Hardware setup
First we have to setup hardware:

- connect J-Link to target hardware using 20-pin plume (better to use original plume, not the du-pont wires shown on the photo)
- connect J-Link to host machine using USB-cable
- power up target hardware, reboot device and enter U-boot console.
Pay attention for configuration flashed to target hardware. In a case of using configuration starting with audio_stream_ or alexa_ sharing JTAG pins with audio SAI interface you shouldn’t let U-boot to load kernel. E.g. you should type enter on power up sequence to stop U-boot count down and stay in U-boot console.
Next we need to install Eclipse IDE and compile toolchain to be used.
It is quite long procedure and if you wish to get fast setup scroll down to Dockerized setup chapter that automates everything to be installed just by typing few commands to the host console. Or check for Readme of that Docker image implemented as separate repository.
Toolchain compilation
$ cd /opt/elcipse/
$ git clone https://github.com/wireless-road/imx6ull-openwrt.git
$ cd imx6ull-openwrt
$ ./compile.sh flexcan_wifi
here better to use /opt/eclipse/ so all environment variable mentioned further in the text stays valid. Otherwise you have to modify them according to the path you selected to install toolchain and eclipse. Again, in a case of using Dockerized setup you don’t have to worry about it at all.
Drivers setup
Install gdb-multiarch:
Download j-link driver from here and install:
IDE setup
Download Eclipse IDE for Embedded C/C++ Developers and install it to /opt/eclipse so eclipse executable to have /opt/eclipse/eclipse/eclipse path and start it. It differs from Eclipse IDE used in previous chapters so better to move to Eclipse IDE for Embedded C/C++ Developers for user space applications development to have just single IDE for all needs.
Press File –> New Project and select C/C++ –> Makefile Project with Existing Code:
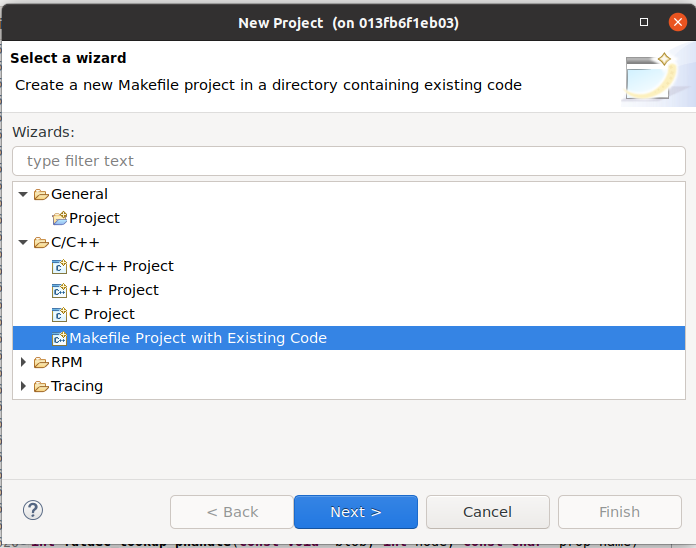
Browse to u-boot sources and press Finish button.

Next we have to provide environment variables to configure IDE for cross-compilation using toolchain compiled on previous step to staging_dir sub-folder. Right click to the project and press Properties. Then navigate to C/C++ Build –> Environment tab and add following variables:
CROSS_COMPILE=arm-openwrt-linux-muslgnueabi-
STAGING_DIR=/opt/eclipse/imx6ull/imx6ull-openwrt/staging_dir/
Then you have to modify already existing variable PATH by inserting following to the start of variable content:
Here few path fot toolchain compiled before splitted by colon.
So you should get following:

Next we need disable default host headers (un-check CDT Cross GCC Built-in Compiler Settings):

and replace them with headers from our toolchain. Add following paths:
/opt/eclipse/imx6ull-openwrt/staging_dir/toolchain-arm_cortex-a7+neon-vfpv4_gcc-7.5.0_musl_eabi/include/
/opt/eclipse/imx6ull-openwrt/staging_dir/toolchain-arm_cortex-a7+neon-vfpv4_gcc-7.5.0_musl_eabi/lib/gcc/arm-openwrt-linux-muslgnueabi/7.5.0/include/
to C/C++ General –> Paths and Symbols –> Includes –> GNU C tab:

enable parallel build:

Let’s try to clean and compile project. Right click on the project –> Clean Project:
 Right click on the project –> Build project:

Next make few changes to enable debugging.
First, enable CONFIG_TOOLS_DEBUG in .config file in the root folder:
If you don’t see hidden files you can enable them by pressing to filtering button:
 and de-selecting .* resources option:
 re-compile project to build image with debugging symbols included.
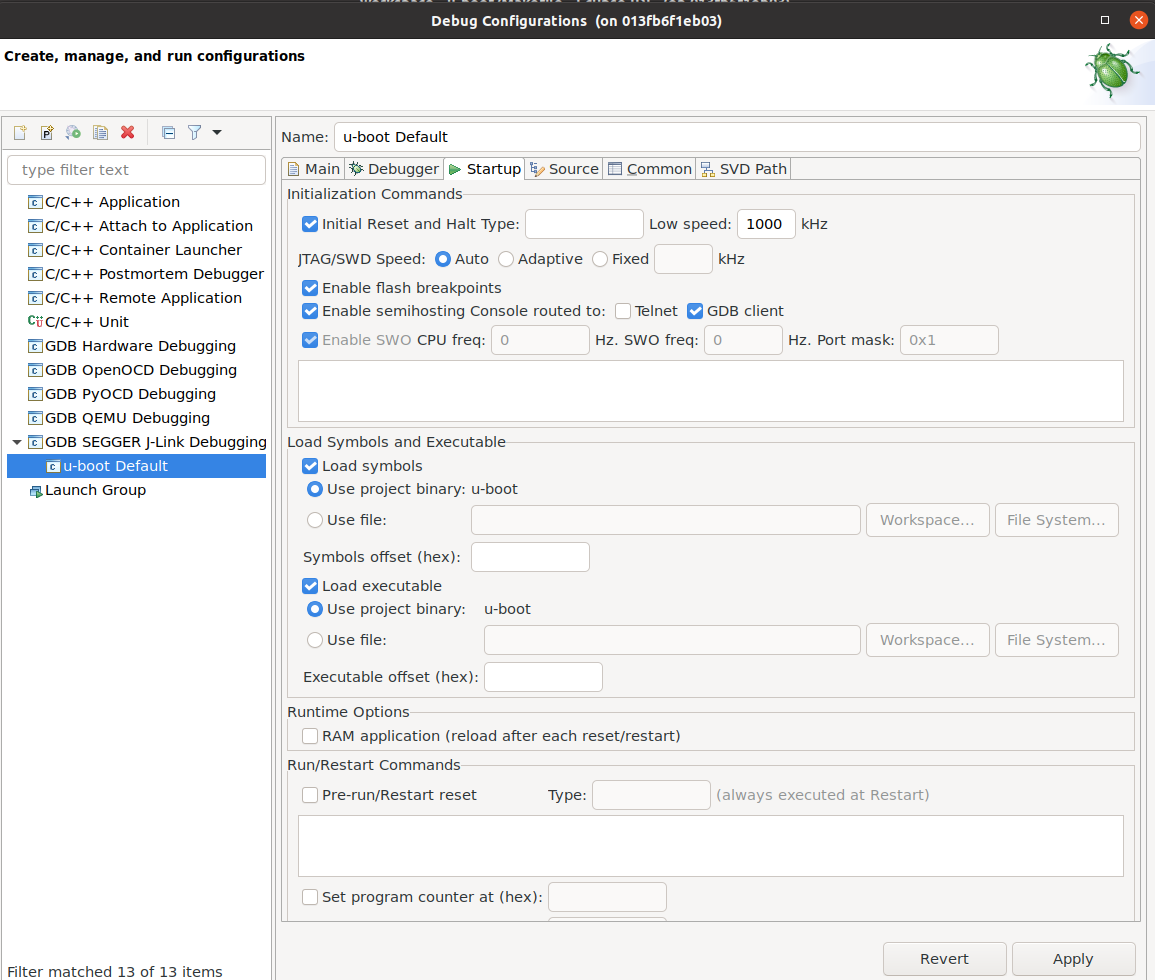
After that time to setup debug configuration. Press to Run –> Debug configuration, create new GDB SEGGER j-link Debugging configuration:


Dockerized setup
You can get everything described above just in few “clicks”:
$ docker-compose run –name openwrt openwrt
and from container’s console:
$ /opt/eclipse/eclipse/eclipse
Here is Eclipse packet in Docker container to get everything isolated and pre-configured. Repo is here.
Dirty hack
when I tried to debug first time it gave me nothing. Here is steps I passed to get it working. Finally got it working just by single line hard coding. Hope to avoid this in future but currently such ugly trick exists.
Type in U-boot console of running (not under debugger):
fdtcontroladdr=8ef216d8
Then open u-boot/lib/fdtdec.c, navigate to fdtdec_setup() function and change:
to:
 That’s it.
Debugging
Now everything is ready for debugging. Press Debug button, click OK to switch to Debug perspective and press Resume button to start application:

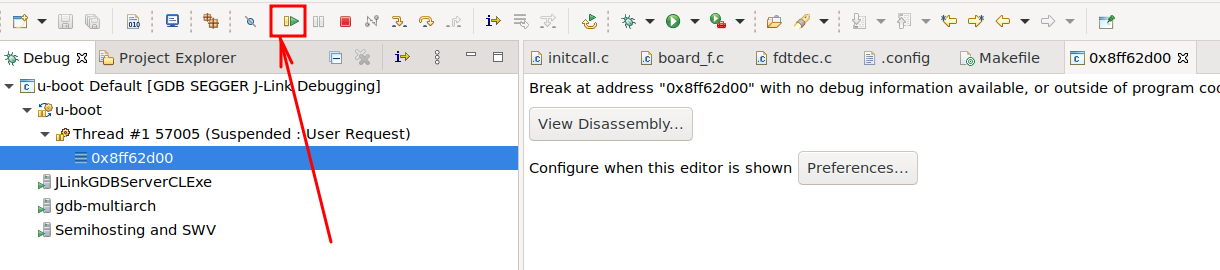
and… You should see U-boot log messages in console. Ok, it is running.
Let’s try to debug using breakpoints. So stop debugging, make power off-on cycle from hardware with j-link re-attaching. Add following break point to initcall_run_list function in debug configuration:

press Debug button and then Resume. Execution should stops at this function:

press to Step Over button few times:
 Now we able to debug U-boot!
Dirty hack issue
Dirty hack with hardcoded address in source code is annoying and making unhappy. Research for workaround started with googling the fdtcontroladdr term. And this magic variable mentioned in U-boot documentation: “fdtcontroladdr” environment variable – is the hex address of the fdt binary blob. As it points to the __end looks like this fdt binary blob placed next to u-boot binary image. Let’s try to do that.
First we need to find that resulted fdt binary blob – and there is u-boot.dtb file exists. Reliable way to make sure that file is fdt blob is check for first four bytes of this file. Just open it using any hex editor and check that it starts with D0 0D FE ED:
 Next we need to load that file to the memory of CPU somehow. GDB let’s you do that using following command:
Here 0x87882d68 is __end address taken from u-boot.map:

So let’s test it from command line first and if it works we will add same instruction to Eclipse somehow.
Running GDB server.
$ JLinkGDBServer -device MCIMX6Y2 -if JTAG -speed 1000
SEGGER J-Link GDB Server V7.54a Command Line Version
JLinkARM.dll V7.54a (DLL compiled Sep 7 2021 14:25:38)
Command line: -device MCIMX6Y2 -if JTAG -speed 1000
—–GDB Server start settings—–
GDBInit file: none
GDB Server Listening port: 2331
SWO raw output listening port: 2332
Terminal I/O port: 2333
Accept remote connection: yes
Generate logfile: off
Verify download: off
Init regs on start: off
Silent mode: off
Single run mode: off
Target connection timeout: 0 ms
——J-Link related settings——
J-Link Host interface: USB
J-Link script: none
J-Link settings file: none
——Target related settings——
Target device: MCIMX6Y2
Target interface: JTAG
Target interface speed: 1000kHz
Target endian: little
Connecting to J-Link…
J-Link is connected.
Firmware: J-Link ARM V8 compiled Nov 28 2014 13:44:46
Hardware: V8.00
Feature(s): RDI,FlashDL,FlashBP,JFlash,GDB
Checking target voltage…
Target voltage: 3.31 V
Listening on TCP/IP port 2331
Connecting to target…
J-Link found 3 JTAG devices, Total IRLen = 13
JTAG ID: 0x5BA00477 (Cortex-A7)
Connected to target
Waiting for GDB connection…
Starting GDB session
It is the path to U-boot sources.
$ gdb-multiarch u-boot –nx
GNU gdb (Ubuntu 9.2-0ubuntu1~20.04) 9.2
For help, type “help”.
Type “apropos word” to search for commands related to “word”…
Reading symbols from u-boot…
(gdb) target remote localhost:2331
Remote debugging using localhost:2331
Cannot access memory at address 0x1b000004
Cannot access memory at address 0x1b000000
Cannot access memory at address 0x1b000004
0x8ff62d00 in ?? ()
(gdb) monitor reset
Resetting target
(gdb) monitor halt
(gdb) monitor sleep 200
Sleep 200ms
(gdb) load
Loading section .text, size 0x5c610 lma 0x87800000
Loading section .rodata, size 0x12f87 lma 0x8785c610
Loading section .hash, size 0x18 lma 0x8786f598
Loading section .data, size 0x6ca4 lma 0x8786f5b0
Loading section .got.plt, size 0xc lma 0x87876254
Loading section .u_boot_list, size 0x1208 lma 0x87876260
Loading section .efi_runtime, size 0x100 lma 0x87877468
Loading section .efi_runtime_rel, size 0x90 lma 0x87877568
Loading section .rel.dyn, size 0xb770 lma 0x878775f8
Loading section .dynsym, size 0x30 lma 0x87882d68
Loading section .dynstr, size 0x1 lma 0x87882d98
Loading section .dynamic, size 0x90 lma 0x87882d9c
Loading section .gnu.hash, size 0x18 lma 0x87882e2c
Start address 0x87800000, load size 536128
Transfer rate: 69 KB/sec, 12468 bytes/write.
(gdb) display /x $pc
1: /x $pc = 0x87800000
(gdb) restore u-boot.dtb binary 0x87882d68
Restoring binary file u-boot.dtb into memory (0x87882d68 to 0x8788953b)
(gdb) b initcall_run_list
Breakpoint 1 at 0x8784dcb8: file lib/initcall.c, line 14.
(gdb) c
Continuing.
Breakpoint 1, initcall_run_list (init_sequence=init_sequence@entry=0x8785d118 <init_sequence_f>) at lib/initcall.c:14
14 {
1: /x $pc = 0x8784dcb8
(gdb) c
Continuing.
And yeah, U-boot booted and log messages appeared in console!
The last thing to be done – add that command to Eclipse:

Don’t forget to remove ugly hardcoded fdt blob address in u-boot/lib/fdtdec.c, fdtdec_setup() function from:
and start debugging process again. It should boot as expected. Still not universal workaround. Still need to be investigated additionally but much better than hardcode in source code.
The last
Don’t forget to enable debugging information and disable optimization by size of course:


and we still not get fully debuggable and controllable U-boot. Next chapter explains last thing we should learn to achieve it.