Lorawan gateway GW-01. Developers guide. OpenWrt.
You may want to build OpenWrt image for GW-01 from source. This gives you way to customize lorawan gateway. As it is open source you can do it easily.
Clone repository with documentation and OpenWrt patch for gateway.
Updating sources tree.
If you use this guide first time omit this step and move to “Building image from sources”. For using this patch first you need to discard changes from older patch by following command:
Now you can apply fresh new patch
Building image from sources.
First you need to download source code of openwrt build tools from official repository by using following command
Move to path with sources
$ ./scripts/feeds install -a
Flashing image.
Flashing first time.
First you need to write image to microSD card
Loading from FTP- or HTTP-server
Put image file to the path of your FTP/HTTP server. For FTP use anonymous user for file loading using this protocol. For example, your server’s IP address is 192.168.1.100. Download image file in /tmp directory of your device using following command (для FTP)
Loading using SCP
Lets consider that IP address of your device 192.168.1.1. Copy image file via scp:
Image update.
For full image upgrade in a case of changes in DTB tree or Uboot while OS configuration storing doesn’t required – use way described above. If you need to store configuration after image updating you need to rewrite DTB/Uboot manually. To update Uboot download openwrt-sunxi-cortexa7-sun8i-h2-plus-orangepi-zero-squashfs-uboot.bin file on your device (via SCP or using FTP/HTTP server) in /tmp directory and run following:
OpenWrt params by default.
IP-address, default access way, user and password.
On first boot device configured to get IP-address using DHCP. You can check for it on DHCP server. Remote access available using SSH. Username to access is root. No password required.
Lorawan gateway configuration.
Configuration file of packet-forwarder library placed in /etc. Path to access it: /etc/global_conf.json
Control mechanism typical for openwrt. To launch daemon manually enter following:
Patch description.
List of source files modified by patch with short description:
./board-configs/orangepi-zero.config
Config file with supporting of OrangePi Zero. Booting from SPI-NOR flash IC. LoraWan packets added by default.
./package/boot/uboot-sunxi/Makefile
Uboot makefile for OrangePi Zero.
./package/boot/uboot-sunxi/patches/999-uboot-sunxi-add-spidev-boot.patch
Patch for Uboot to support linux kernel booting from SPI-NOR flash IC.
./target/linux/sunxi/patches-4.14/203-ARM-dts-sun8i-activate-SPI-spidev-and-flash.patch.diff
Linux kernel patch with support of SPI-NOR flash IC. Second SPI interface added to communicate with SX1301 (/dev/spidev1.1).
./target/linux/sunxi/config-4.14
Linux kernel configuration. Added support for SPI interface and SPI-NOR IC partitions checking.
./target/linux/sunxi/image/gen_sunxi_sdcard_img-ng.sh
Auto configuration of raw image to write on microSD card.
./target/linux/sunxi/image/Makefile
Main makefile. Added link to OrangePi’s makefile.Description of steps to compile resulted images.
./target/linux/sunxi/image/cortex-a7-orangepi-zero-ng.mk
Description of steps to compile resulted images.
./target/linux/sunxi/base-files/lib/upgrade/platform.sh
Script used for image upgrade using sysupgrade. Allows remotely upgrade image without overwriting configuration.
./toolchain/musl/patches/101-added_qsort_r.patch
qsort_r function added to musl library. As lora-gateway packet uses this function but this function presents only in GLIBC or uClibc adding this function mandatory.
./package/lora/lora-gateway/
LoRaWAN packets directory.
./package/lora/packet-forwarder/
Semtech’s packet-forwarder packet.
./files/
Default config files directory.
Detailed description of patch.
Sources used by patch.
All changes in patch were maid manually except following.
UBoot
To support booting from SPI-NOR flash IC Sunxi’s official repository was used. Branch that was used is sunxi-spi. Pin mux (gpio configuration) supporting added in patch. DTB tree changes for flash partitions configuration.
LoraWan
Lorawan packets was ported from xueliu repository. Changes for local compilation. Manual sources update without using external resources. Patch from repository was applied manually. Patches were moved in applied-patches-to-src directory. You don“t need to use it anymore. Lora Packages chapter was added to menuconfig to simplify navigation.
SPI-NOR flash IC partitions.
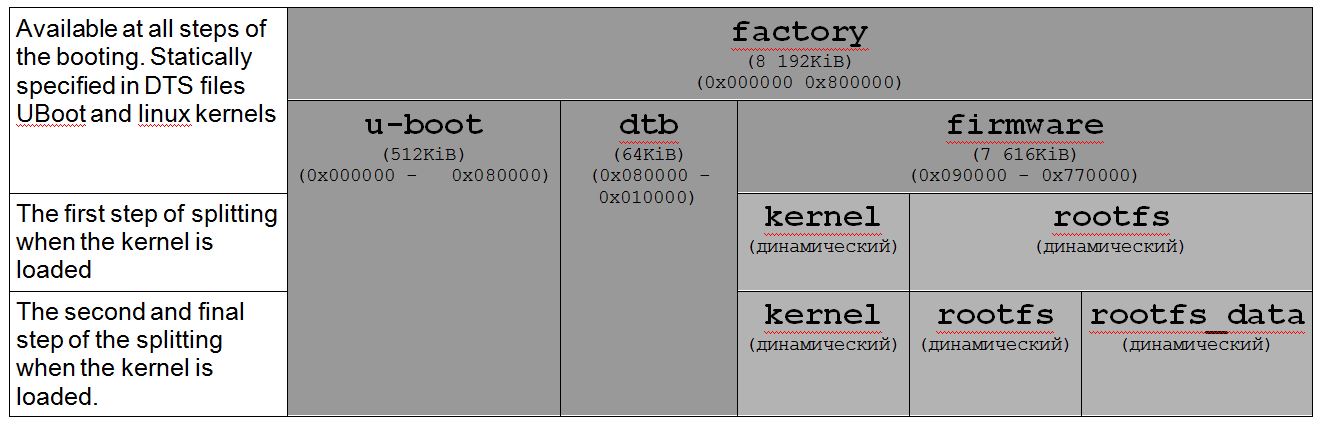
Openwrt allows you to dynamically change the structure of flash IC when the system boots. This is done for the convenience of the main subsystems, file-size requirements, technical limitations of working with NOR flash drives (no wear-leveling and inability to work as with a conventional block device). Main filesystem in OpenWrt for linux kernel is squashfs, secondary filesystem, used by OpenWRT – JFFS2. Squashfs doesn’t support write mode (static) and is formed at the time of image compiling, has better compression parameters. JFFS2 supports write operations and wear-leveling to reduce the wear of flash drives, but because of this has significantly worse compression characteristics.
The basic set of partitions of the flash drive is the uboot partition and firmware partition for the main system. For simplicity of porting and compatibility of all firmware images ( for SD-card and for SPI-NOR IC) a separate section for DTB on SPI-NOR is required. It is called DTB.
The base partitions are mentioned in the corresponding dts files for UBoot and the linux kernel.
With each download of Openwrt, there are two splits of partitions. The first partition is based on the name of the partition with the firmware (in the firmware section it is assumed that there is a linux kernel packed in a special image format uImage, created by the mkimage utility from UBoot, and squashfs), in which the linux kernel size is read, at the end of which the erasesize the minimum amount of erasure) of the flash drive is searched for a sign (MAGIC combination of bytes) of the beginning of squashfs. If the file system is found, the system dynamically creates the kernel and rootfs partitions. The kernel section corresponds exactly to the boundaries of the linux kernel, and rootfs occupies the rest of the region.
The second partition occurs when the rootfs section appears, at the end of which the kernel looks for (at the erasesize boundary) a pointer to the start of JFFS2. The pointer is placed during image compilation and is aligned to the size of the flash block size. After that, the kernel creates another partition called rootfs_data.
When the system is subsequently booted, the available partitions are mounted in the required order. The executable file mount_root is responsible for this. At the very first loading of the device, the JFFS2 file system is created on the rootfs_data partition.
For the usual work in an openwrt environment with the ability to write and delete files, the subsystem of the OverlayFS kernel is used. This file system allows you to emulate the behavior of standard systems using only one file system available for writing, all changes in the structure are stored in it.
For the convenience of updating and initial recording on the flash, the factory section is also presented, covering the entire volume of the SPI-NOR flash drive (8MiB).
A visual representation of the sections on SPI-NOR is presented below:
Some useful links to work with GW-01: