Embedded linux. Speed up development process.
Speed up embedded linux development process
Each software developer who decides to start with Embedded linux development, coming either from high-level programming languages, or from bare metal development for microcontrollers in C/C++, is inevitably surprised by the extreme unfriendliness of embedded linux. A text pad and console utilities instead of the usual IDE and debugging using logs instead of debugging using programmator greatly slows down the development process. You have to cross-compile target application or even whole images again and again and deliver it to target hardware to test how it works.
This article describes how I was able to reduce the delivery time of changes to the target hardware when cross-compiling 10 times.
Cross-compilation
Is a process of building binary image or executable ffile for target device on host machine with different architecture. It is commonly used in a case of Embedded linux driven target hardware with low amount of available Flash and RAM (32Mb and 128Mb in our case) so no way to compile anything on target hardware itself.
In that case typical flow of changing source code on target hardware is following:
- Downloading source code from network to host machine. Using git command usually. Happens just once usually when you start to work on new project or moved to new PC.
- Cross compilation of single application (binary file) or whole image (uImage file) on host machine. Using make utility in a case of OpenWrt.
- Delivery of build binary file to target hardware (using scp utility in our case) and firmware update in a case of full image rebuilt (using sysupgrade utility in a case of OpenWrt).
Most of the time, obviously, is spent on the second stage. It slows down especially dramatically when working with heavyweight libraries with a lot of dependencies. В нашем случае это библиотеки tensorflow-lite (used for neural networks) and alexa-voice-sdk (voice assistant).
All three stages (full image building and firmware upgrade) took us 150 minutes. Of course, this was rarely encountered.
The second stage, in case of rebuilding the firmware, took 30 minutes. In case of rebuilding a heavyweight application using neurons – 13 minutes. This is the most common scenario.
The third stage itself (in a case of firmware update) took 5 minutes: first, the firmware was copied from the host to the target hardware using the scp utility. Then the firmware was updated using the sysupgrade utility.
At some point in time this became very tedious, as development process slowed down dramatically. Each light change in source code required a long compilation and delivery process. As a result, one day we decided to get rid of this pain.
As a result we got:
- 16 minutes for all three stages on first firmware build. Instead of 150 minutes.
- 3 minutes for repeated full firmware rebuild (second stage) instead of 30 minutes.
- 1.5 minutes for repeated heavy-weight application (tensorflow-lite) rebuild (second stage) instead of 13 minutes.
- 0-10 seconds for changes delivery to target hardware instead of 5 minutes.
Of course, miracles do not happen and we had to spend a large enough amount of money to achieve such a result. The easiest way was to speed up as much as possible, obviously, the first stage. To do this, we just switched to the fastest Internet tariff suggested by our provider.
Speed up compilation process
We doubted for a long time whether it would make sense, but nevertheless decided after reading articles about inspirational benchmarks and bought an AMD Threadripper 3970X based workstation:

We also bought an NVIDIA GeForce 3080TI video card for working with Neural Networks, 128 GB of RAM and 1 TB ssd disk.
Finally got all components and finished assembling the PC late at night, installed Ubuntu and first of all started building the firmware. Disappointing to see that it takes more than 30 minutes to compile image instead of expected 2 minutes. Didn’t I saw that timing on benchmarks? Ofcource I used -j64 flag. Went to bed upset. Next morning I started compilation along with running htop utility. Mostly I saw following during build process:
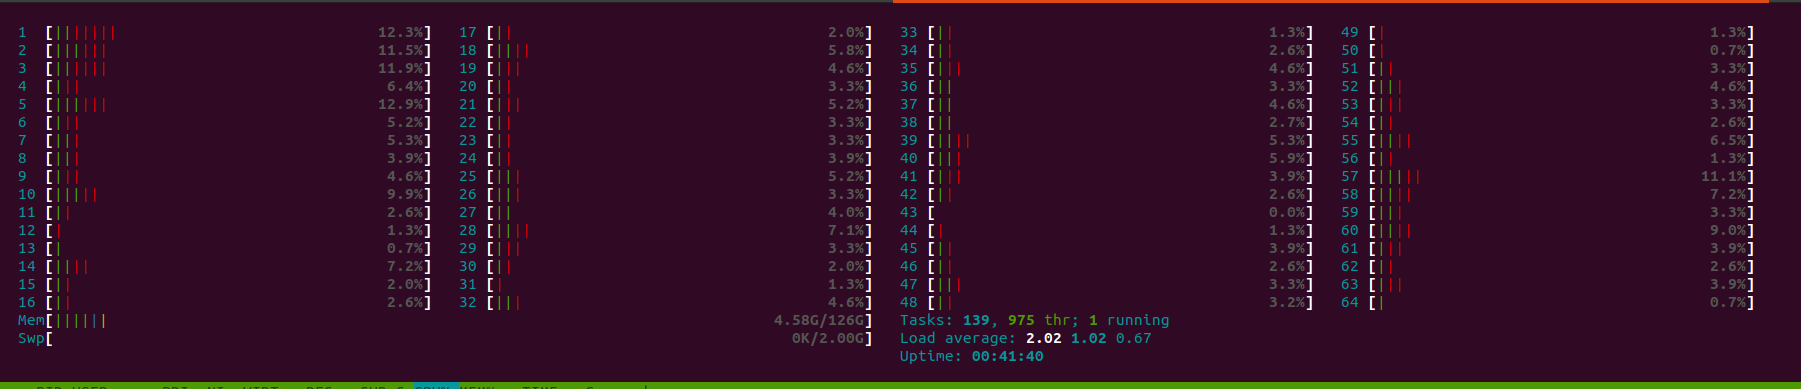
sometimes:

hardly ever:

The latter inspired me. Seems that I just need to figure out why my build environment won’t use all 64 cores I have even with -j64 flag provided by me. So google gave me answer quite fast with source code example (Pull request at one of the last comments in thread) to fix the issue. So after making same changes at my source code I got desired three minutes to recompile image. I was so happy! The purchase fully justified itself!
In addition to this, I tried to play with RAMDISK:
$ sudo mount -t tmpfs -o rw,size=2G tmpfs /mnt/ramdisk
$ df -h
$ cd /mnt/ramdisk
$ git clone …
but didn’t get any speed up of build process.
Speed Up firmware delivery from Host to Target
Thanks for google I knew that instead of copying resulted binary firmware from Host to Target using scp and firmware upgrade using sysupgrade I can use remote resources to boot kernel image and remote file system instead of onboad flash IC of my target hardware. Keeping in mind from my experience how difficult it can be to install and configure properly an utility like NSF server, I decided to include TFTP-server and NFS-server both in my build environment using Docker and Docker-compose. In short they are like a magical pill to remove headache of fighting with countless error messages during installation and configuration some new utility you want to install. Instead of this you just press a button:
so,
Installing TFTP server to boot kernel image
here is Dockerfile of TFTP-server:
FROM debian:stretch-slim
MAINTAINER danrue drue@therub.org
# https://github.com/danrue/docker-tftpd-hpa
RUN apt-get update && \
apt-get install -y –no-install-recommends \
tftpd-hpa && \
rm -rf /var/lib/apt/lists/*
CMD echo -n “Starting ” && in.tftpd –version && in.tftpd -L –user tftp -a 0.0.0.0:69 -s -B1468 -v /srv/tftp
and docker-compose.yml file:
services:
tftpd-hpa:
container_name: tftp
build: .
volumes:
– ./volume:/srv/tftp
ports:
– 69:69/udp
restart: always
To start on a host machine type:
The only thing to do after that is placing kernel image file (uImage) of your target device in volume folder which appeared after running TFTP server with previous command:
Source code might be found here.
Everything is ready to boot kernel of target hardware from TFTP server (u-boot in our case). But before switching to target device console don’t forget to check firewall on the host:
if it is in active state just disable it temporarily:
Kernel booting from TFTP server.
Kernel of linux to be loaded by bootloader. In a case of using U-boot no need to recompile anything in source code as U-boot able to boot from remote TFTP-server by default. First of all you have to save current booting cmd:
=> saveenv
Saving Environment to SPI Flash…
board_spi_cs_gpio bus 2 cs 0
SF: Detected w25q256 with page size 256 Bytes, erase size 4 KiB, total 32 MiB
Erasing SPI flash…Writing to SPI flash…done
Later if will need to restore your boot mode back you will be able to do it just by typing:
=> saveenv
Next step we need to provide network settings to let bootloader to know where in network can he find kernel image:
=> setenv ethaddr 86:72:04:c5:7e:83
=> setenv serverip 192.168.31.37
=> setenv uimage openwrt-imx6ull-cortexa7-tensorflow_wifi_dev-uImage
=> setenv loaddadr 0x82000000
where 192.168.31.99 is static IP address to be used by target device, 192.168.31.37 – is IP address of Host Machine, 0x82000000 – is address in RAM kernel image to be stored for booting and openwrt-imx6ull-cortexa7-tensorflow_wifi_dev-uImage – is kernel image to be downloaded. It was placed in volume folder on previous step. If you don’t know loadaddr first of all check that isn’t it provided already? Otherwise device will be unable to boot kernel at all. Just type:
and check for that variable or any other variable with similar name.
Now let’s try to ping server:
Using FEC device
host 192.168.31.37 is alive
Great. Server is available to ping. Next, let’s download kernel image:
Using FEC device
TFTP from server 192.168.31.37; our IP address is 192.168.31.99
Filename ‘openwrt-imx6ull-cortexa7-tensorflow_wifi_dev-uImage’.
Load address: 0x82000000
Loading: #################################################################
#################################################################
#########################################################
345.7 KiB/s
done
Bytes transferred = 2742194 (29d7b2 hex)
Ok. So if everything is ok network settings we need to save them to not input them again on next booting:
And there is time to boot:
## Booting kernel from Legacy Image at 82000000 …
Image Name: ARM OpenWrt Linux-4.14.199
Image Type: ARM Linux Kernel Image (uncompressed)
Data Size: 2742130 Bytes = 2.6 MiB
Load Address: 80008000
Entry Point: 80008000
Verifying Checksum … OK
Loading Kernel Image … OKStarting kernel …[ 0.004494] /cpus/cpu@0 missing clock-frequency property
[ 0.128440] imx6ul-pinctrl 2290000.iomuxc-snvs: no groups defined in /soc/aips-bus@02200000/iomuxc-snvs@02290000
[ 0.917942] fec 20b4000.ethernet: Invalid MAC address: 00:00:00:00:00:00
[ 1.800403] mxs-dcp 2280000.dcp: Failed to register sha1 hash!
[ 7.239994] DHCP/BOOTP: Reply not for us on eth1, op[2] xid[e2dbd4aa]
Press the [f] key and hit [enter] to enter failsafe mode
Press the [1], [2], [3] or [4] key and hit [enter] to select the debug level
Please press Enter to activate this console.
Here is booted using kernel uImage downloaded manually from network but using local file system from onboard flash IC. Let’s automate boot process. Reboot system for that:
and press enter on countdown to be started. Here you entered U-boot console again.
=> setenv bootcmd “$defbootcmd”
=> saveenv
Now you have devbootcmd for development purposes to boot from network and previously stored defbootcmd to boot from onboard flash for production purposes.
To check if it works just reset the device:
You should see similar for previous log messages of downloading uImage from network. But we still using jffs from flash IC. Time to install NFS server to mount network file system.
Installing NFS server to mount network file system
We will use Docker as we did it for TFTP server.
Here is Dockerfile:
FROM alpine:3.6
MAINTAINER Tang Jiujun <jiujun.tang@gmail.com>
# https://github.com/tangjiujun/docker-nfs-server
RUN set -ex && { \
echo ‘http://mirrors.aliyun.com/alpine/v3.6/main’; \
echo ‘http://mirrors.aliyun.com/alpine/v3.6/community’; \
} > /etc/apk/repositories \
&& apk update && apk add bash nfs-utils && rm -rf /var/cache/apk/*
EXPOSE 111 111/udp 2049 2049/udp \
32765 32765/udp 32766 32766/udp 32767 32767/udp 32768 32768/udp
COPY entrypoint.sh /entrypoint.sh
RUN chmod +x /entrypoint.sh
ENTRYPOINT [“/entrypoint.sh”]
docker-compose.yml:
services:
nfs:
build: .
container_name: nfs
volumes:
– ./volume:/nfsshare
ports:
– 111:111
– 111:111/udp
– 2049:2049
– 2049:2049/udp
– 32765-32768:32765-32768
– 32765-32768:32765-32768/udp
privileged: true
restart: always
and entrypoint.sh script used by Dockerfile:
#!/bin/bash
set -ex
: ${EXPORT_DIR:=”/nfsshare”}
: ${EXPORT_OPTS:=”*(rw,fsid=0,insecure,no_root_squash,no_subtree_check,sync)”}
mkdir -p $EXPORT_DIR
echo “$EXPORT_DIR $EXPORT_OPTS” > /etc/exports
mount -t nfsd nfsd /proc/fs/nfsd
# Fixed nlockmgr port
echo ‘fs.nfs.nlm_tcpport=32768’ >> /etc/sysctl.conf
echo ‘fs.nfs.nlm_udpport=32768’ >> /etc/sysctl.conf
sysctl -p > /dev/null
rpcbind -w
rpc.nfsd -N 2 -V 3 -N 4 -N 4.1 8
exportfs -arfv
rpc.statd -p 32765 -o 32766
rpc.mountd -N 2 -V 3 -N 4 -N 4.1 -p 32767 -F
Same command to be used to build container and start it:
Two different utilities (TFTP server and NFS-kernel-server) built and started using single command. Here is unification provided by Dockerfile. Source code to build and run NFS server might be found here.
Similar folder (volume) to be used to mount inner docker container folder with host directory. That folder to be shared in network. Here we need to unpack archive with target file system:
build system builds tar.gz archived file system along with kernelt uimage file.
You can test NFS server from another machine in same local network by running:
mount.nfs: timeout set for Fri Aug 20 23:28:36 2021
mount.nfs: trying text-based options ‘vers=3,addr=192.168.31.37’
mount.nfs: prog 100003, trying vers=3, prot=6
mount.nfs: trying 192.168.31.37 prog 100003 vers 3 prot TCP port 2049
mount.nfs: prog 100005, trying vers=3, prot=17
mount.nfs: trying 192.168.31.37 prog 100005 vers 3 prot UDP port 32767
$ ls mnt/
dev lib mobilenet_v1_0.25_128_quant.tflite proc root sys usr www
where 192.168.31.37 – is IP address of machine running NFS server and /home/al/mnt – local folder to be mounted to network folder shared by server. You can unmount folder any type by entering:
Mount network file system to target hardware
Now it is time to test NFS at target device. First we have to check if NFS support enabled in our current kernel at all? For that we type:
in root folder of our linux distributive sources. UI configuration menu should opens. Here you need to find “Compile the kernel with rootfs on NFS” option. Such option location might changes from distributive to distributive. In our case it is placed at:


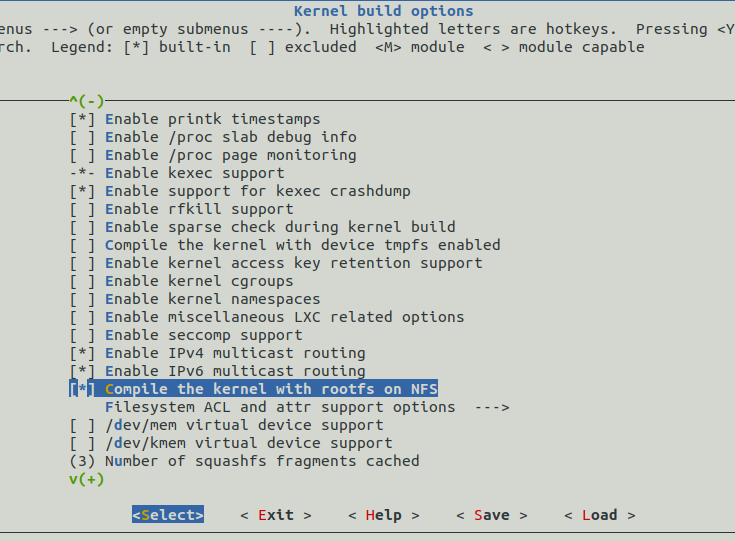
If you see that this option already enabled (* sign exists) you can to mount NFS to your target machine just by providing single configuration parameter in U-boot console. Otherwise (as in our case) you have to do following:
- enable that option by pressing Y
- exit configuration menu and save changes
- recompile image and save resulted uImage file in volume folder of TFTP-server as we did it before.
- reboot U-boot just to be sure that there is no previous Kernel version already downloaded to the RAM.
So the only configuration option need to be provided at U-boot is bootargs but, again, you have to check current value of that parameter:
if it returns something store it as default (production) parameter:
=> saveenv
Later, when you will need to switch back to default boot mode you have to type:
=> setenv bootargs “${defbootargs}”
=> saveenv
if you saved something previously. Otherwise you need to remove bootargs instead of restoring it’s default value:
=> setenv bootargs
=> saveenv
And here is how you need to set bootargs to boot from NFS:
=> setenv bootargs “${devbootargs}”
=> saveenv
and then reboot device:
Let the bootloader to boot kernel from TFTP-server. But now it should also mount network file system. Wait for console activating and type:
[ 0.000000] Kernel command line: console=ttymxc0,115200 rootwait fixrtc quiet ip=dhcp console=ttymxc1 rootwait rw root=/dev/nfs nfsroot=192.168.31.37:/nfsshare,nolock,v3,intr,hard,noacl
[ 4.175865] VFS: Mounted root (nfs filesystem) on device 0:10
Great! Now any change in volume folder of NFS server at Host will become immediately available at target file system. To test it create hello_world file on Host machine:
and check if it available at target:
you should see it there.
So what is the point to boot from TFTP and NFS? Speed! On recompiling something at host you can deliver changes to target device almost immediately in a case of single application recompilation – you need just to cp it to NFS’s volume folder and about 10 seconds in a case of whole image recompilation (cp kernel uImage and reboot). Instead of wasting 3-7 minutes by doing it using scp and sysupgrade utilities. You can automate cp procedure by modifying build scripts ofcourse.
At U-boot you can switch to any boot mode any time. To development (network) mode:
=> setenv bootargs “${devbootargs}”
=> saveenv
To production mode:
=> setenv bootargs “${defbootargs}”
=> saveenv
or
=> setenv bootargs
=> saveenv
if nothing was stored to that variable previously.
Here is commits implementing everything described here.
Tested and used on real hardware.
Summary
So time of most common development scenario (second and third stage) when we make some changes in source code and recompile image image/single application followed with delivery that change to target device reduced:
- from 13 + 1 minutes for single application recompilation and scp-ing it to target to 1.5 minutes.
- from 30 + 7 minutes for whole image recompilation with following scp/sysupgrade to 3 minutes + 10 seconds of recompilation and rebooting.
It gave as way to test up to 20 changes in source code on target hardware per hour instead of 1-2 changes earlier. Embedded linux development process speed increased 10x times! Can’t believe that we wasted so much time for it before!
Join our telegram channel to see more photos and videos from development process.